How to use local DeepSeek in Cursor

Introduction
Cursor, with its AI-powered features, has significantly boosted my productivity in daily development work. DeepSeek has also become a buzzword in recent weeks.
In this blog post, I'll guide you through the process of connecting Cursor with a locally running DeepSeek model. By the end of this post, you will have a seamless integration set up, enabling you to enjoy the power of AI without too many external dependencies.
Why?
Let's be honest, saving money is my primary motivation for setting up a local LLM model and connecting Cursor with it. This way, I don't need to pay the subscription fee for Cursor (though I'll have to say goodbye to some features), nor do I need to pay for the cost of calling APIs from OpenAI or other providers.
Another big reason is that DeepSeek had to disable user sign-ups from outside of mainland China due to massive malicious attacks. Even if Cursor could support DeepSeek natively today, I would not be able to get a DeepSeek API key at this moment. Additionally, the service of DeepSeek appears to be unstable, likely due to the high attention it receives.
Besides these reasons, there are more benefits like better privacy and data control, reliability, and customization. However, we both know these might be moot points.
How?
Let's jump into the most interesting part - how to set everything up. Note that this is one way of using local DeepSeek in Cursor, not the only way. If you don't like any tool I use, feel free to use your favorite alternatives. Also, I did all these on my MacBook, which will differ from how it would work on Linux or Windows. Still, I hope this will be a useful reference for everyone.
Step 1: Install Ollama, and run DeepSeek with it
DeepSeek's official documentation recommends a few tools for running the model locally, but I opted for Ollama due to its simplicity. I don't need to worry too much about how the model works under the hood. (I tried setting it up with LMDeploy, but it required installing PyTorch with CUDA, which is not an option on macOS.)
To install Ollama, you can download the installer from Ollama's website, or alternatively, install it with HomeBrew:
% brew install ollama

...

% ollama --version
ollama version is 0.5.7
With Ollama, you will be able to pull the DeepSeek model and run it locally.
% ollama pull deepseek-r1

pulling manifest
...

writing manifest
success

% ollama list

NAME                        ID              SIZE      MODIFIED
deepseek-r1:latest          0a8c26691023    4.7 GB    9 days ago
llama3.2:latest             a80c4f17acd5    2.0 GB    9 days ago
This page lists the DeepSeek models, including all those distilled ones. In a later section of this blog post, I will discuss how I experimented with them and which one I ended up using.
With the DeepSeek model pulled locally, you can either run the model and chat with it or call the local APIs at http://localhost:11434. Ollama supports APIs with OpenAI schema, which allows us to connect it with Cursor. Let's try calling the API before moving on to the next step.
% curl http://localhost:11434/v1/chat/completions -H "Content-Type: application/json" -d '{
  "messages": [
    {
      "role": "system",
      "content": "You are a test assistant."
    },
    {
      "role": "user",
      "content": "Testing. Just say hi and nothing else."
    }
  ],
  "model": "deepseek-r1"
}'

{"id":"chatcmpl-258","object":"chat.completion","created":1739430390,"model":"deepseek-r1","system_fingerprint":"fp_ollama","choices":[{"index":0,"message":{"role":"assistant","content":"\u003cthink\u003e\nAlright, the user has sent \"Testing. Just say hi and nothing else.\"\n\nHmm, so they might be trying out how my response works.\n\nMaybe they just want to interact with me without any specific question first.\n\nI should respond in a friendly way to keep the conversation going.\n\u003c/think\u003e\n\nHello! How can I assist you today?"},"finish_reason":"stop"}],"usage":{"prompt_tokens":18,"completion_tokens":70,"total_tokens":88}}
Step 2: Set up Cloudflare tunnel
Now that you have the DeepSeek model working locally, there is a key missing part - Cursor cannot talk to your localhost endpoint directly. This is because, when you chat with Cursor, the requests will be sent to Cursor's backend service first, and those services will then interact with OpenAI or Anthropic models or whatever endpoint you provide, which cannot be something like http://localhost:11434.
You will need a cloud tunnel to establish the connection between the Cursor backend service and your localhost. Cloudflare and ngrok can both serve this purpose, and I prefer Cloudflare due to its simplicity.
First, let's install the Cloudflare CLI:
% brew install cloudflared

% cloudflared --version
cloudflared version 2025.2.0 (built 2025-02-03T18:39:00Z)
With the Cloudflare CLI, you can create a quick tunnel like the following, or if you have a Cloudflare account, you can also create the tunnel with proper credentials.
% cloudflared tunnel --url http://localhost:11434 --http-host-header="localhost:11434"

...

2025-02-17T02:01:15Z INF |  Your quick Tunnel has been created! Visit it at (it may take some time to be reachable):  |
2025-02-17T02:01:15Z INF |  https://xxxxxxxxxx.trycloudflare.com

...
Note that the --http-host-header="localhost:11434" parameter in this command is critical for it to work properly. Without this parameter, Ollama will block the API request and return a 403 Access Denied error. (Reference)
You can verify this tunnel using a curl command similar to Step 1:
% curl https://xxxxxxxxxx.trycloudflare.com/v1/chat/completions -H "Content-Type: application/json" -d '{
  "messages": [
    {
      "role": "system",
      "content": "You are a test assistant."
    },
    {
      "role": "user",
      "content": "Testing. Just say hi and nothing else."
    }
  ],
  "model": "deepseek-r1"
}'
{"id":"chatcmpl-479","object":"chat.completion","created":1739757801,"model":"deepseek-r1","system_fingerprint":"fp_ollama","choices":[{"index":0,"message":{"role":"assistant","content":"\u003cthink\u003e\nAlright, so I need to figure out how to approach this problem about testing in software development. The user mentioned they're testing, just said \"hi\" followed by nothing else after the initial greeting. Hmm, maybe they didn't finish their thought.\n\nSince it's a bit ambiguous, I should be ready for multiple scenarios. First, maybe they were interrupted or forgot to provide more details about what exactly they're testing. In that case, I should prompt them to clarify which part of testing they need help with—are they analyzing test cases, designing tests, debugging issues, or something else?\n\nAlternatively, perhaps the user was trying to get a response but might have made an error in sending their message. It's also possible they were just being tested and didn't realize I could infer from their input.\n\nI should acknowledge my initial assumption about them saying \"hi\" without more context and ask for clarification. That way, I can address the problem accurately instead of making wrong assumptions based on limited information.\n\u003c/think\u003e\n\nIt seems like your initial message was cut off or not complete. Could you please provide more details about what you're testing or what specific assistance you need? I'm here to help!"},"finish_reason":"stop"}],"usage":{"prompt_tokens":18,"completion_tokens":241,"total_tokens":259}}
Step 3: Configure Cursor
Now you are ready to configure Cursor to use the locally installed DeepSeek.
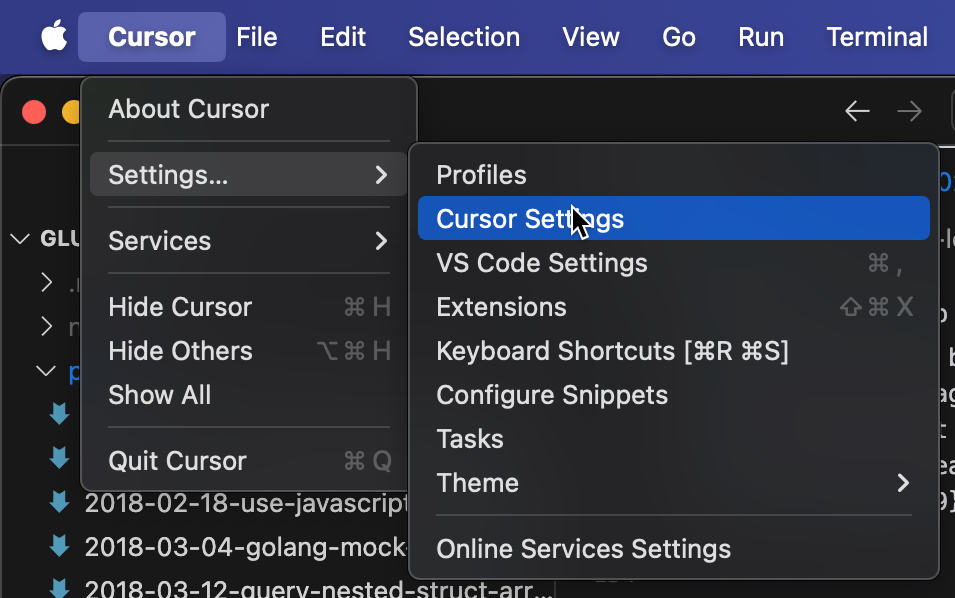
Go to "Cursor - Settings - Cursor Setting"
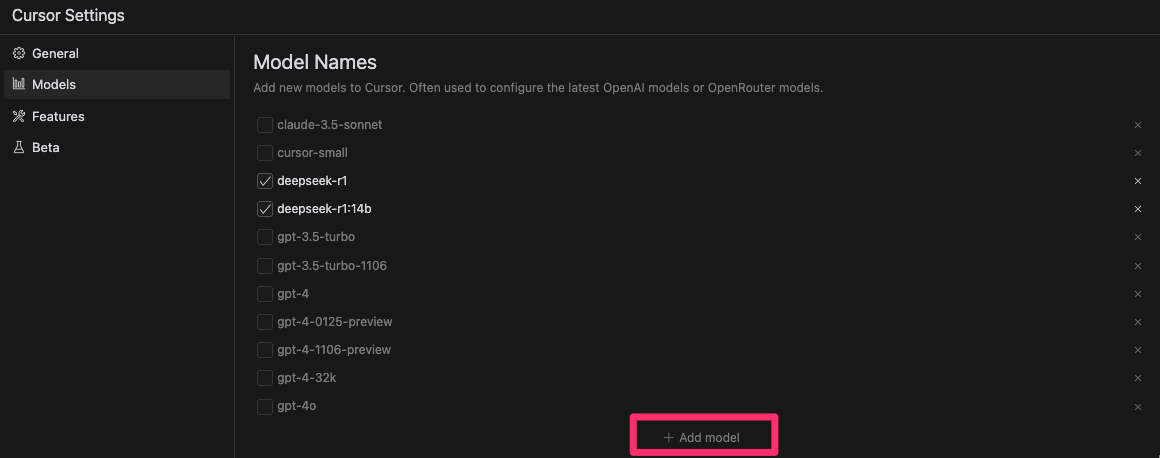
The first step is to add the DeepSeek model. On the Models tab, click the "Add model" button, type in deepseek-r1 in the textbox, then click the "Add model" button on the right side to add the DeepSeek model to Cursor. (In the screenshot below, you can see I also have the deepseek-r1:14b distilled model in the list, let's talk about which model to choose later.) You will also need to deselect other non-DeepSeek models, like Claude-3.5, GPT, etc., because you don't have those models running locally at this point.
The next step is to configure the endpoint. Let's scroll down to the "OpenAI API Key" section for that. You can put any placeholder string in the textbox for the API key, since our local model will not care about it (however, it cannot be empty). More importantly, you will need to expand the "Override OpenAI Base URL" section and put in https://xxxxxxxxxx.trycloudflare.com/v1 (note the /v1 part at the end).
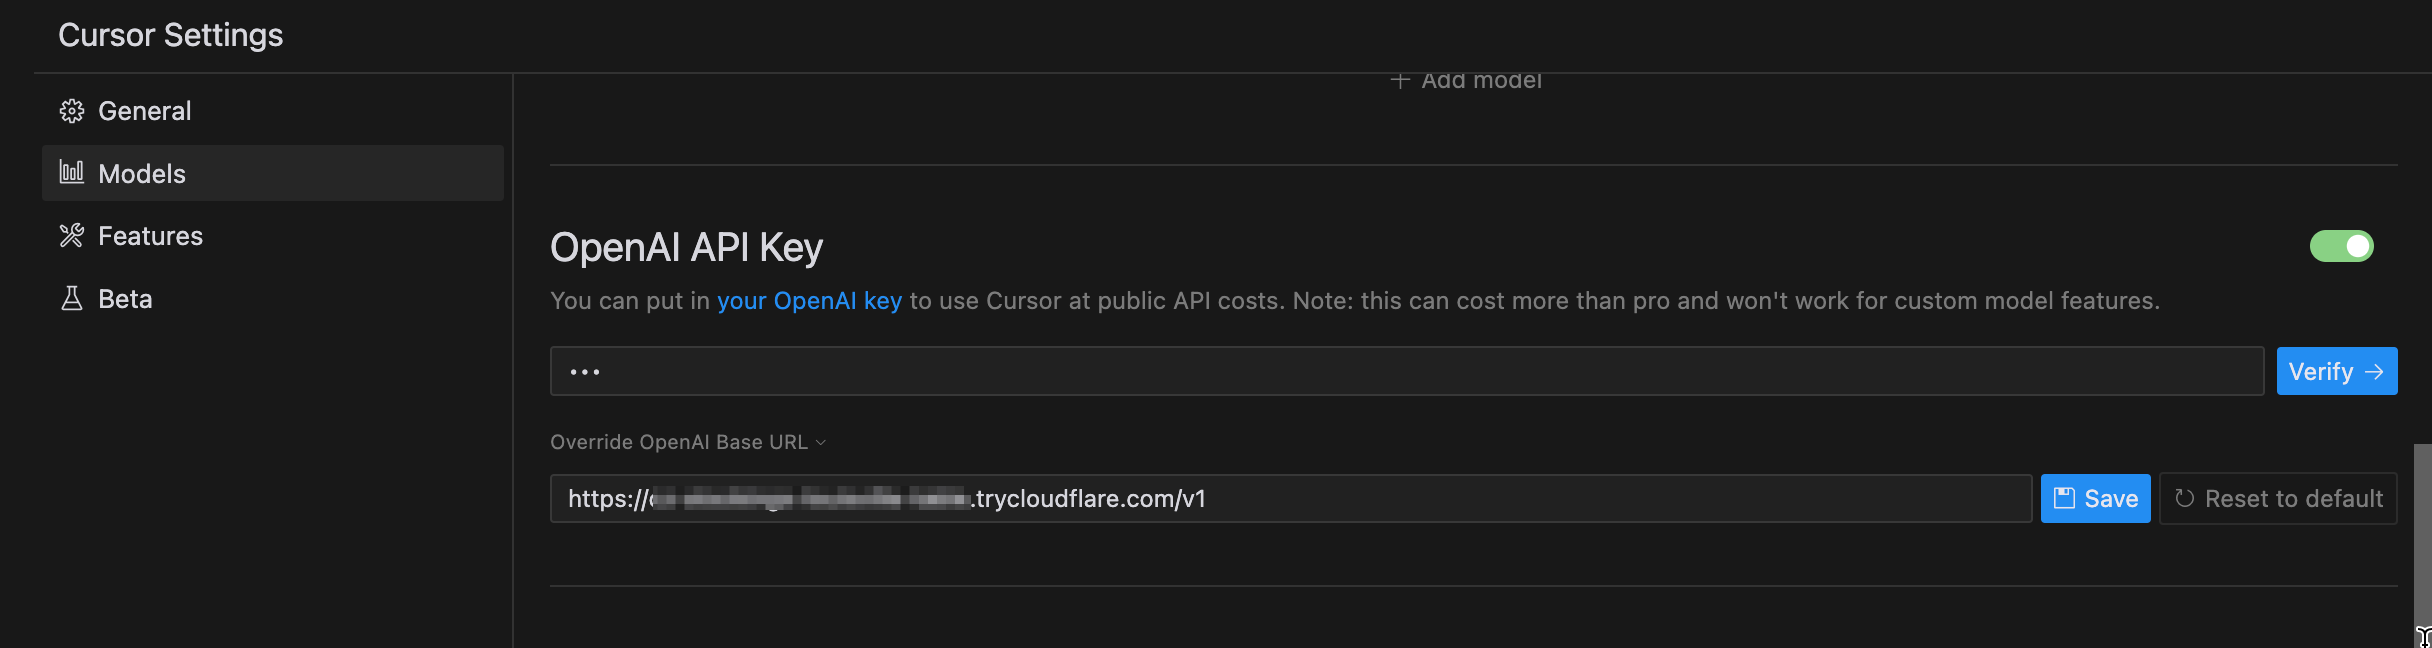
At this point, let's save the config and click the "Verify" button to see if Cursor will be happy about this configuration. If there is no error popup, you should be able to go back to your coding work and chat with Cursor that is driven by our locally installed DeepSeek.
Before you go: Which DeepSeek model to choose?
On Ollama's page, you can see there are the original DeepSeek model with 671b parameters, and multiple distilled models available. If you have a very powerful machine, you can probably go ahead and run the 671b model locally. But I don't think that will be possible for most of us, so you will have to choose a distilled model that fits you best.
When you install deepseek-r1 with Ollama, the default one that will be installed is actually the distilled model DeepSeek-R1-Distill-Qwen-7B with 7b parameters.
% ollama list
NAME                        ID              SIZE      MODIFIED
deepseek-r1:latest          0a8c26691023    4.7 GB    3 days ago
deepseek-r1:671b            739e1b229ad7    404 GB    3 days ago
deepseek-r1:70b             0c1615a8ca32    42 GB     3 days ago
deepseek-r1:32b             38056bbcbb2d    19 GB     3 days ago
deepseek-r1:14b             ea35dfe18182    9.0 GB    3 days ago
deepseek-r1:8b              28f8fd6cdc67    4.9 GB    3 days ago
deepseek-r1:7b              0a8c26691023    4.7 GB    3 days ago
deepseek-r1:1.5b            a42b25d8c10a    1.1 GB    3 days ago
Obviously, different models will bring different performance when dealing with coding tasks, and different models will also have different hardware requirements. I tested a few of these models and found that the models larger than deepseek-r1:14b will drive my laptop to a point where the API requests from Cursor will timeout. (My laptop is a 2024 MacBook Pro with M4 chips, as a reference.) I believe you will want to do some tests as well to see which of these models will be the best fit for you.
Conclusion
In this blog post, we walked through the detailed steps for setting up Cursor with a locally installed DeepSeek model - installing Ollama, downloading the DeepSeek model, setting up a cloud tunnel with Cloudflare, and configuring Cursor. By following these steps, you can integrate and utilize DeepSeek models locally within Cursor for your coding tasks. Enjoy coding!
References
Encountering issues with delv on MacOS? Here is how to resolve the 'no crypto support' error by updating to the latest version.
Newer PostAWS Amplify Announced IAM Role Support For SSR Applications, FinallyDiscover how AWS Amplify's new IAM Compute Role enhances security for server-side rendered (SSR) applications. This guide walks you through the setup process, ensuring your SSR applications are both secure and efficient.