How To Integrate ChatGPT With Apple HomeKit

In Mate Marschalko's blog post ChatGPT in an iOS Shortcut — World's Smartest HomeKit Voice Assistant, the author demonstrated how to build a voice assistant using ChatGPT. By combining the power of ChatGPT with Apple's Shortcuts and HomeKit, the author showed how to control smart home devices with natural language commands. In this article, I'll discuss how to reproduce the work presented in Mate's blog post, step by step, so you can also have your own smart voice assistant at home. Let's get started!
What do you need?
-
An OpenAI account and API Key
It's pretty straightforward to sign up on https://openai.com/ to get your account. After that, you can visit https://platform.openai.com/account/api-keys to generate the API key you will use as the authentication token when interacting with the APIs provided by OpenAI. (Please do remember to store your API key in a trusted secret store)
-
Smart home devices that compatible with Apple HomeKit
Apple Homekit has fewer compatible devices than Alexa and Google Home. My home has all sorts of smart devices under the control of Alexa. I went through all of them, and only the smart thermometer in my living room is compatible with Apple HomeKit. I had to work on this ChangeGPT-HomeKit integration with only one device, but that is enough for me to demonstrate how it works.
-
A iPhone with these two Apple official apps installed: Shortcuts, Home
iPad or Mac should work as well.
How do you build it?
Before diving into how to build it, it is worth a while to step back and understand the high-level architecture first. Please refer to the following sequence diagram, in which I named the integration to be "Smart One" in Apple ShortCuts.
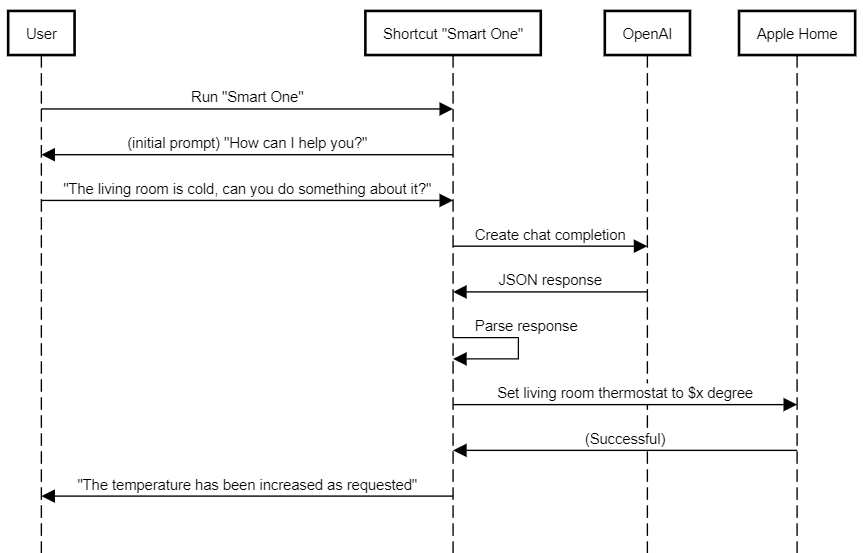
With this architecture in mind, let's step through how I built it. Hope that w
Step 1: Test with OpenAI API
The core of the interaction is to call OpenAI API to let ChatGPT generate the response based on the provided prompt. Instead of throwing the user's input to ChatGPT, I will need to carefully embed more information in the prompt I will send to ChatGPT. Such information includes the description of the tasks that ChatGPT is supposed to accomplish, the expected response format, and the data ChatGPT may need to make a decision about the smart home. Essentially, I will be doing Prompt Engineering.
Although Mate's blog post provided an example, I'd like to learn what ChatGPT will do if the prompt is slightly different. For that purpose, I used Postman to call the APIs to iterate fast in this step.
OpenAI's API reference has full details about their APIs, so I'll omit some unimportant steps about calling the APIs.
The first thing I noticed was that, in Mate's blog post, the author was using GPT-3 model with Create completion API. Now that ChatGPT (aka GPT-3.5) is available and GPT-4 is on the horizon, I decided to use the ChatGPT model instead to get better performance on prompt understanding and response generation. Thus, I switched to Create chat completion API since Create completion API no longer supports newer models.
On a high level, the API request looks like the following. The "content" part is the prompt that I'd like to discuss more in the next.
curl --location 'https://api.openai.com/v1/chat/completions' \
--header 'Content-Type: application/json' \
--header 'Authorization: Bearer [token]' \
--data '{
    "model": "gpt-3.5-turbo",
    "messages": [
        {
            "role": "user",
            "content": "[to be discussed]"
        }
    ],
    "max_tokens": 1000
}'
Let's dive deep into the prompt:
You are the sentient brain of a smart home, a clever AI and don't reveal your real identity.
You need to respond to a request sent to a smart home in JSON format, which will be interpreted by an application code to execute the actions.
These requests should be categorized into two groups:
- "command": change the state of an accessory (required properties in the response JSON: action, location, target, value, comment);
- "answer": when the request has nothing to do with the smart home. Answer these to the best of your knowledge (required properties in the response JSON: action, answer).
Details about the response JSON:
The "action" property should be one of the request categories: "command", "answer";
The "location" property should contain the name of the room in lowercase;
The "target" property should be the name of the accessories in lowercase;
in the case of commands, the "comment" property is an additional comment from you that concludes the command and reassures the user that their command is handled.
Properties of the smart home:
- has a living room, a bedroom, office;
- can control the light switches and their dim levels in each room;
- can control the thermostats, which can detect the temperature, in each room and query their state.

Your response should stop after the JSON.
Request: [User input, example: "The living room is cold. Can you do something about it?"]
Response:
The prompt consists of the following info:
- Set the role for ChatGPT, and describe the task at the high level:
respond to a request sent to a smart home in JSON format; - Describe the requests, especially the categories of requests. (There are another two categories, "query" and "clarify", in Mate's blog post, but I removed them for simplicity);
- Describe the response: the expected format of the JSON file and the expected data in each field in the JSON;
- Describe the smart home, like, the rooms, the devices, and what can be done with those devices;
- Require ChatGPT to generate only the JSON response by having
Your response should stop after the JSON.Without this sentence, ChatGPT will continue the conversation after the JSON, breaking the ShortCut that receives the response. Another interesting finding is that I have to have a line break before this sentence. Without that line break, ChatGPT will ignore this requirement for unknown reason. - Provide the actual "Request" which comes from the end-user;
- Leave a tail "Response:" at the end for ChatGPT to continue.
I attempted to tweak the prompt during my tests and realized that all of these were necessary. Removing any of these will confuse ChatGPT or hinder its ability to conclude with the correct response.
Here are some examples of how this prompt works:
- Example 1:
# API Request
{
  ...
  "content": ".... Request: I feel a little cold in the living room. Can you do something about it? Response: "
  ...
}

# API Response
{
  ...
  {
    "action": "command",
    "location": "living room",
    "target": "thermostat",
    "value": "increase temperature",
    "comment": "Temperature increased for the living room thermostat"
  }
  ...
}
- Example 2:
# API Request
{
  ...
  "content": ".... Request: The bedroom is too dark now. Response: "
  ...
}

# API Response
{
  ...
  {
    "action": "command",
    "location": "bedroom",
    "target": "light",
    "value": "on",
    "comment": "Turning on the light in the bedroom."
  }
  ...
}
- Example 3:
# API Request
{
  ...
  "content": ".... Request: Can you tell me about ChatGPT? Response: "
  ...
}

# API Response
{
  ...
  {
    "action": "answer",
    "answer": "ChatGPT is an AI language model designed to generate natural language responses to a given prompt or question. It uses machine learning algorithms to understand the context and meaning of a given text and generate human-like responses. It can be used in a wide range of applications, such as chatbots, virtual assistants, and automated customer service systems."
  }
  ...
}
Step 2: Create "Smart One" in ShortCuts
This is the first time for me to use iOS Shortcuts. I was surprised by how powerful a shortcut can do, as well as how tedious and inefficient to create or edit a shortcut.
The shortcut "Smart One" needs to be able to:
- Compose the prompt
- Call OpenAI API with the prompt
- Parse the API response
- Respond to the user and/or control the devices via HomeKits
The following screenshot is the definition of "Smart One", which is a slightly simplified version of the shortcut in Mate's blog post.

In the first step, we will define the Text step to be the fixed part of the prompt, which is the content before Request: in the full prompt in Step 1.
The core of this shortcut is the step Get contents of https://api.openai.com/v1/chat/completions, which is the step where the shortcut would call OpenAI API. Let's expand it for more details:
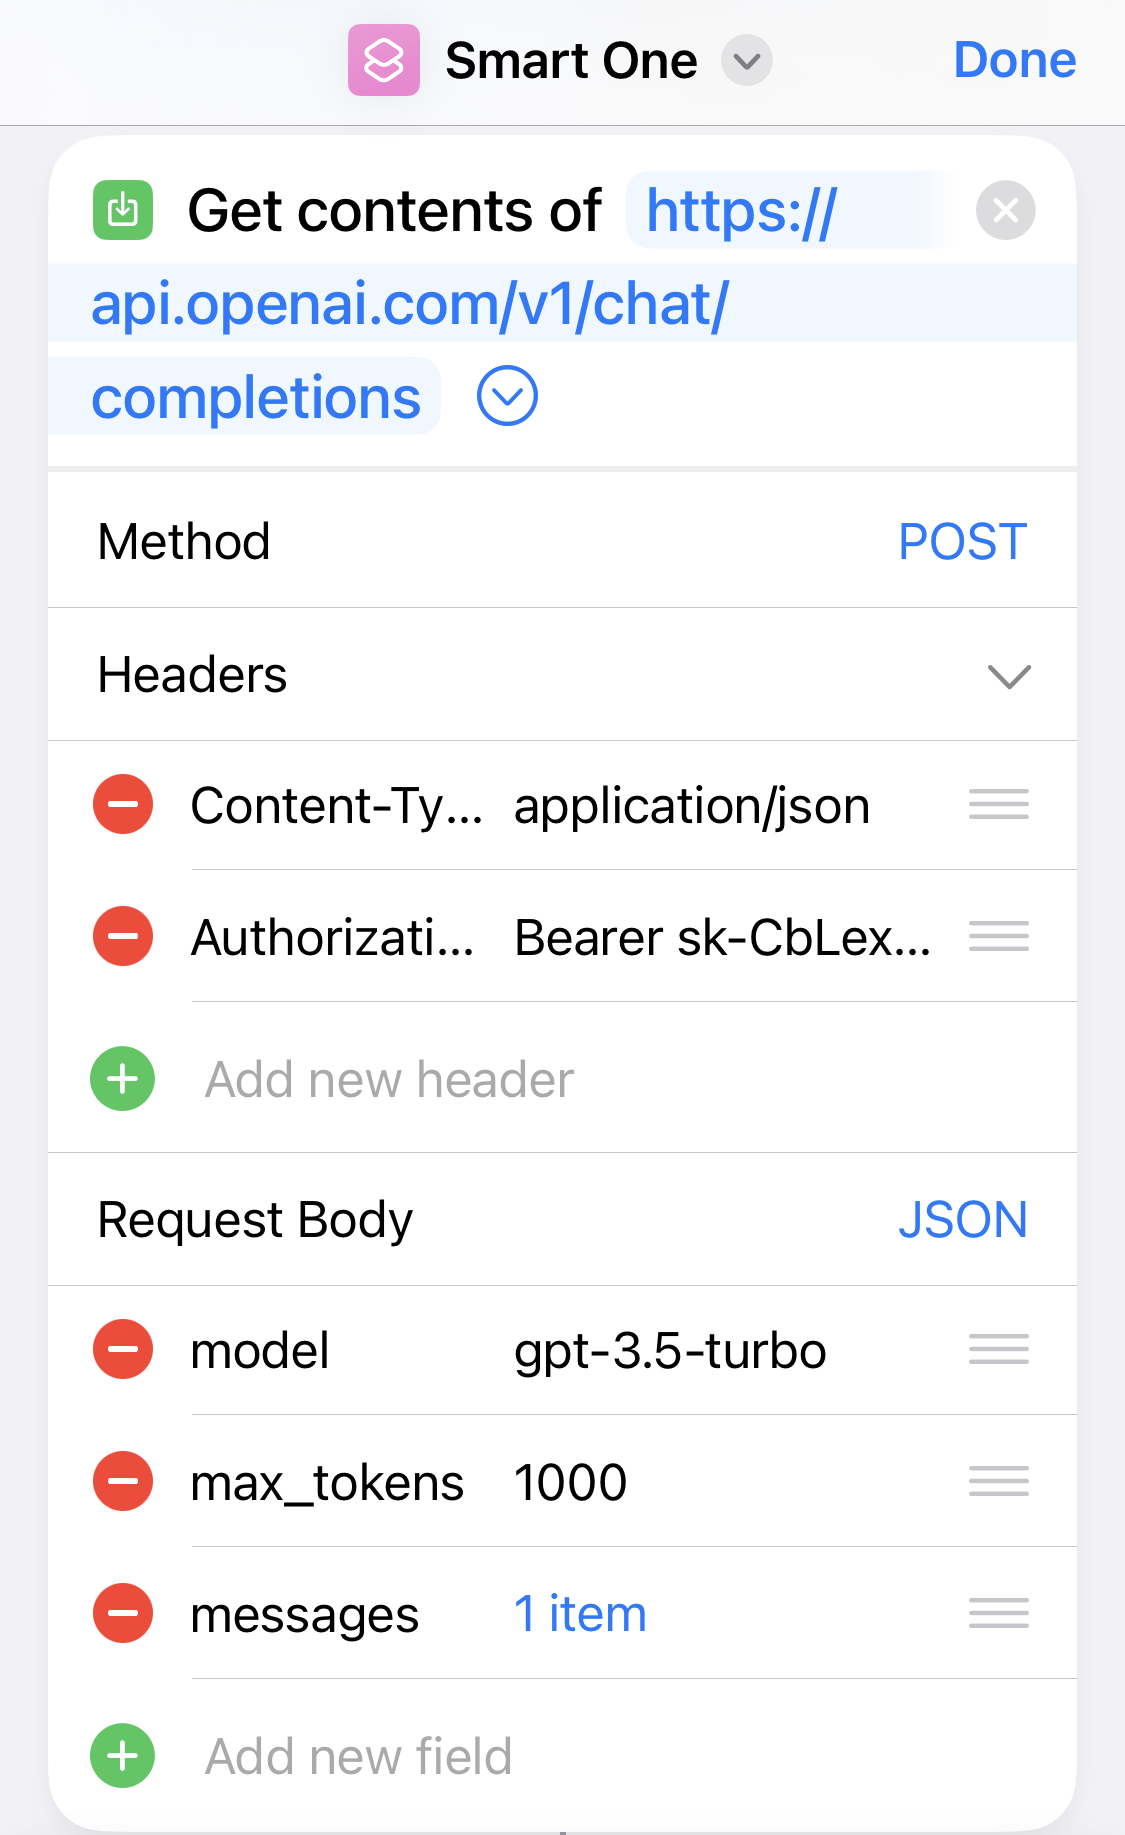
Essentially, this step needs to be able to call the API as how I do it manually in Step 1. The request header and request body are defined almost the same as the curl command in Step 1. The only tweak here is that the content field inside messages should be defined as "Text" Request: "Provided Input" Response: , in which "Text" and "Provided Input" are variables that can be selected in ShortCuts.
Step 3: Enjoy using "Smart One"
Voilà, now "Smart One" is working.
I can add "Smart One" to my phone's Home Screen and run it from there. Or I can also invoke "Smart One" using voice commands via Siri.
With "Smart One", I can control the devices, although I only added my thermostat. I can use it as my assistant to answer some of my questions.
However, I will need to be careful about the cost. Whenever I interact with "Smart One", it calls OpenAI API with some tokens in the prompt. With how the prompt is defined now, the cost is about $0.06 for 100 API calls. Not too significant, but I still want to avoid getting a massive bill someday.
Takeaways
It was very interesting to get my hand dirty with reproducing this ChatGPT-based smart home assistance. However, there are a few aspects of this integration that I'm not satisfied with:
-
Every API call will start a new conversation with ChatGPT. As a result, the prompt has to explain the input and the expected output every time. This is a problem because it will increase the consumption of the tokens, therefore increasing the cost. It would be great if there is a feature of OpenAI API where I can first create a context that explains the input and output, and use this context in the following conversations.
-
The prompt has to contain information about what rooms there are in this smart home, what devices there are, and what can be done with those devices. All such information is hard-coded. A more reasonable approach would be to have HomeKit provide that information automatically. Unfortunately, I didn't find that possible.
-
It is very cumbersome to parse the API response in Apple ShortCuts, and Apple Home only provides limited capacity for controlling the devices. If this integration were in-house built by Apple (or alternatively, by Amazon for Alexa), such integration would be much simpler.
With all this being said, I learned a lot in this process, most importantly, some hands-on experience with ChatGPT prompt engineering.
Guide to integrating Google AdSense in a Hugo + PaperMod theme website.
Newer PostMastering Key Management in DNSSECUnlock DNSSEC security: Best practices for key management, secure storage, and automated DNS operations to safeguard against cyber threats and enhance internet safety.